Automated Arming
Arming has several complementary modes of operation, that can be selected and mixed as you need.
Mobile Actions, Buttons and Alarm Panel changes are classed as Manual Interventions, and won't be overridden back by AutoArm unless there's an occupancy change or other manual intervention.
Alarm Panel Control
AutoArm listens for changes to the Alarm Control Panel from other sources, like the Home Assistant mobile companion app or other automations, with AutoArm respecting the selected new state, and applying the same Manual Intervention controls for further state changes.
Voice Assistants
The Home Assistant Alarm Control Panel can also be exposed to a Voice Assistant, so disarm or arm by talking to Alexa or similar. Use the Settings->Voice Assistants page in Home Assistant to do this.
Alexa has additional controls to prevent unauthorized disarming ( otherwise burgulars could shout through the letterbox! ), see Connect Your Home Security System to Echo Hub on the Amazon documentation.
Physical Button Control
Handy if you have a Zigbee, 433Mhz or similar button panel by the door - choose one of the Button Integrations entities for DISARMED,ARMED_AWAY etc, or a Reset button to set the panel by the default algorithm.
A delay can be set, so if for example you have an away button next to the front door, you can give yourself a couple of minutes to exit the property before the alarm is set.
See also the Manual MQTT Alarm Control Panel for another way to integrate physical buttons to control state.

Example Cheap 433Mhz Buttons Using RFLink
Mobile Action Control
This works similar to the buttons, except its driven by Actionable Notifications. See Mobile Actions for more information, and the Contextual Mobile Actions Recipe for a nice way to do this in Supernotify where only the appropriate actions are shown.
These can be added to any notification, so for example noisy PIR alerts can be quickly squelched by disarming the alarm.
Home Assistant Action
An action (aka "service") called autoarm.reset_state can be used to trigger a state reset. It will work the same way as other resets, such as at sunrise or sunset.
Calendar Control
Configuration split
Calendar entities and no_event_mode are configured via the AutoArm Options UI. Per-calendar state_patterns and poll_interval remain in YAML.
Integrating a Calendar
Use a Home Assistant calendar integration to define when and how to arm the control panel. If you don't have one, follow these instructions.
Using a Remote Calendar, Google Calendar or similar also means that alarm scheduling can be done remotely, even if you have no remote access to Home Assistant.
Multiple calendars, of different types, can be configured, and specific alarm states / match patterns per calendar. See the example configuration
Recurring State
Armed or disarmed state can be configured with an entry for that purpose, for example a recurring entry on a Local Calendar dedicated to AutoArm, or looking up an existing calendar to find vacations by pattern.
If there's no calendar event live, then arming state can fall back to [Diurnal Control], or fixed at a default state, or left to manual control.
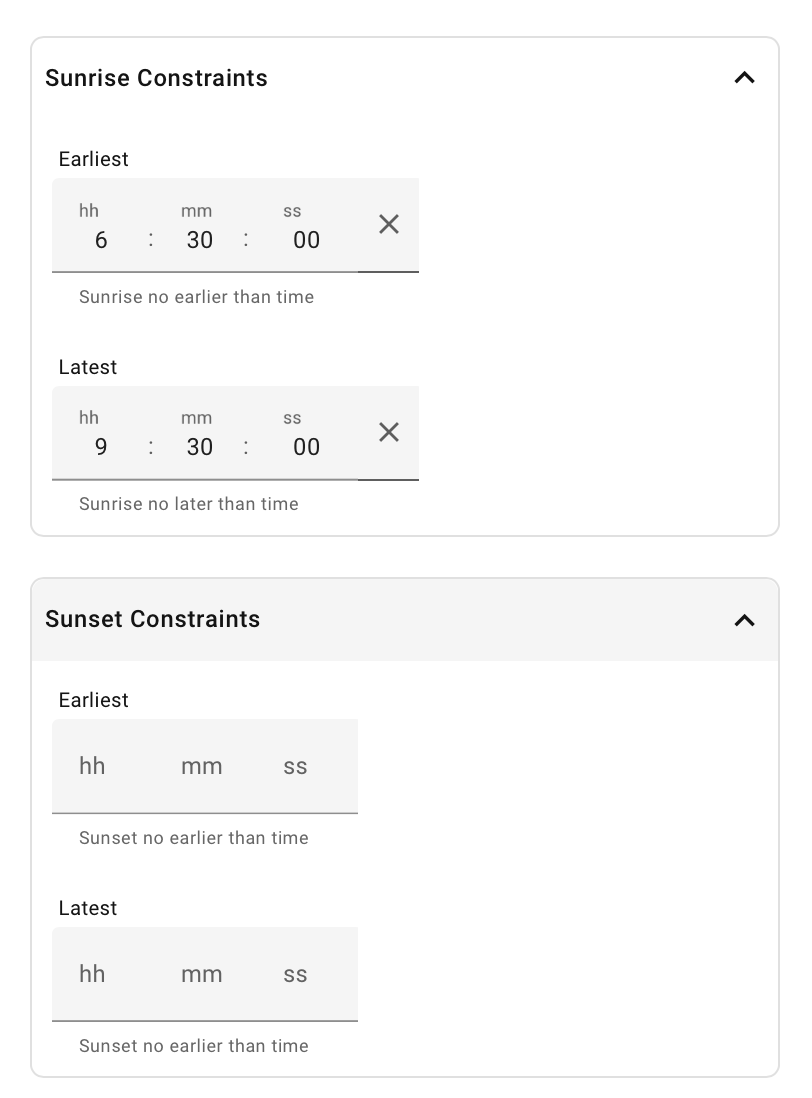
Diurnal Control
This does three things to support [Automated Transitions]:
- Re-evaluate the alarm state at sunrise
- There's a
earliestandlatestcutoff option in the UI config to stop alarm being disarmed at 4am if you live far North, like Canada or Scotland. - The cutoffs for sunrise can be set to the same time to override the
sunintegration altogeher for sunsrise
- There's a
- Re-evaluate the alarm state at sunset
- There's a
earliestandlatestcutoff option in the UI config, which works identically to that for sunrise
- There's a
- Provide a
dayandnightvalue for conditions
Occupancy Control
Configuration split
Person entities and occupancy default_state are configured via the AutoArm Options UI. The delay_time setting remains in YAML.
The people who live at the property can be defined as Person Integration entities Person Entities in the occupancy configuration, and used to derive an occupied value for [Automated Transitions]. This works best with the Companion App on a mobile phone, although other Device Tracker Integrations can work, such as a home network device_tracker.
Tip
Since the occupied check looks for entities that have a state home, it doesn't have to be person entities, and you can add a list of device tracker entities. The advantage of Person is that you can define multiple trackers for a single individual, and they are home if any of the trackers are home, even if some of them haven't kept up.
See the Presence Detection guidance from Home Assistant on how to set this up, and the options for using it.
If the house is occupied, and its daytime, some people like that to be disarmed and others prefer armed_home. You can control this via Calendar Control or use the state_default settings for day and/or night in the occupancy configuration.
One problem with device trackers is that they can be noisy, for example if someone tracked by phone walks out of wifi range, or reboots their device. This tends to be a problem when building occupied, since its much less likely for a device tracker to intermittenly think the device is at home. A delay timer can be set, separately for home and not_home, to smooth this out, so alarm won't reset unless someone still out a few minutes later.
In this configuration, there will be a three minute wait to make sure the device tracker stable for home->not_home, and zero delay when arriving home.
  occupancy:
    entity_id:
      - person.house_owner
      - person.tenant
    default_state:
      day: disarmed
      night: armed_night
    delay_time:
      not_home: 180
Automated Transitions
YAML-only
Transition conditions are configured entirely in YAML.
If nothing else is configured ( occupancy, buttons, calendars ) then arming will still happen by the state of the sun. The rules for this, and how occupancy is used, are all defined as Home Assistant Conditions and can be overridden as you need.
| Diurnal State | Occupancy State | Alarm State |
|---|---|---|
| day | occupied | ARMED_HOME(*) |
| day | empty | ARMED_AWAY |
| night | occupied | ARMED_NIGHT |
| night | occupied | ARMED_AWAY |
(*) This can be overridden using state_default in the occupancy configuration, for example if you prefer to have the alarm set to disarmed when people are home and its daylight.
Two other states, armed_vacation and disarmed can be set manually, by buttons, or calendar.
If you need more predictability, especially for high latitudes where sunrise varies wildly through the year, set up a calendar and define exactly when you want disarming or arming to happen.
Algorithm Conditions
The defaults below will be used if there is no transition defined ( you can override just one of them if you prefer, and the others will remain as default, leave conditions empty if you really want to disable the transition).
autoarm:
  transitions:
    armed_home:
        - "{{ autoarm.occupied and not autoarm.night }}"
        - "{{ autoarm.computed and autoarm.occupied_daytime_state == 'armed_home'}}"
    armed_away: "{{ not autoarm.occupied and autoarm.computed}}"
    disarmed:
        - "{{ autoarm.occupied and not autoarm.night }}"
        -  "{{ autoarm.computed and autoarm.occupied_daytime_state == 'disarmed'}}"
    armed_night: "{{ autoarm.occupied and autoarm.night and autoarm.computed}}"
    armed_vacation: "{{ autoarm.vacation }}"
Conditions have an autoarm field added to the context, with these values. The examples above are all in the shortcut template style, though any other style of condition can be used, along with other Jinja2 features and Home Assistant extras, including AND/OR/NOT logic.
| Field | Type | Usage |
|---|---|---|
| daytime | bool | The sun integration thinks it is daytime |
| night | bool | The sun integration thinks it is nighttime |
| occupied | bool | If any of the person entities have state home |
| at_home | list[str] | List of occupancy entities at home |
| not_home | list[str] | List of occupancy entities not at home |
| manual | bool | Alarm Panel is in vacation or 'custom bypass' mode |
| computed | bool | State is being computed by the algorithm |
| vacation | bool | Shortcut for Alarm Panel state being ARMED_VACATION |
| bypass | bool | Shortcut for Alarm Panel state being ARMED_CUSTOM_BYPASS |
| disarmed | bool | Shortcut for Alarm Panel state being DISARMED |
| state | str | Current alarm control panel state |
| calendar_event | CalendarEvent | Most recent active Calendar Event |
| calendar_event.start | datetime | Event start date/time |
| calendar_event.end | datetime | Event end date/time |
| calendar_event.summary | str | Event summary |
| calendar_event.description | str | Event description |
| calendar_event.location | str | Event location |
| occupied_daytime_state | str | Default state for occupied in day time |